Article
10 tips and tricks to enhance your workflow in Resource Management by Smartsheet
In this article, we'll show you 10 "hidden" tips and tricks in Resource Management by Smartsheet that will help speed up your workflow. Whether you’re new to the software or a seasoned pro, you’re almost certain to find something new that will improve how you use the tool.
Let’s get started.
1. Save and share the schedule image from the Project Brief
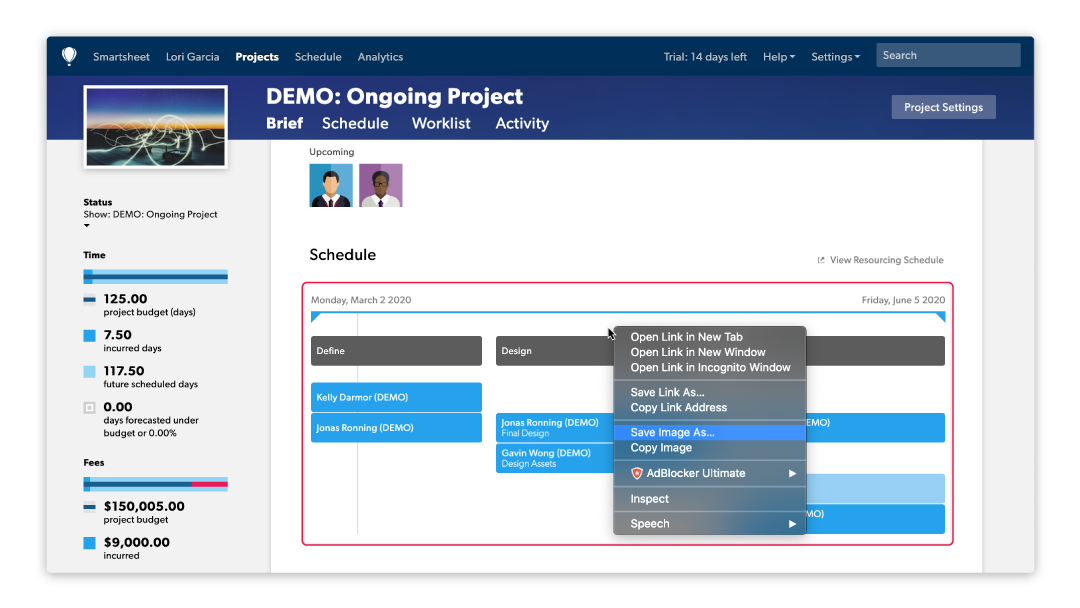
The schedule preview on the Project Brief provides a quick look at all of the phases and assignments for the project. But did you know it’s embedded here as an image?
You can easily save and share it with your team during status meetings, or when someone asks for an updated timeline.
How to do it:
- Navigate to the Project Brief for any project
- Right-click on the schedule and choose Save Image As…
- Save it to a location of your choice to use in a status meeting, print it out, or send to people 1:1
2. Add hyperlinks in Project Description
The new Project Brief documents project outcomes in the project description, displays the project team, and allows you to create printable and shareable project plans.
You won't always be able to capture all the information about the project here, though, so we enabled hyperlinks in the Project Description to link to other relevant project information. This is an easy way to add important links to hosted documents from Google Drive, Box, or Dropbox, or project-related links from other software tools like Trello or Jira.
How to do it:
- Click on Add Project Description on the Project Brief
- Copy and paste the link you want to add
- Repeat for all your other links
- Click Save
3. Quickly sketch out new project phases and assignments
Project planning can be a cumbersome process if you get stuck in all the details up front. That’s why we’ve added a new way to quickly plan your projects at a high-level from the project Worklist.
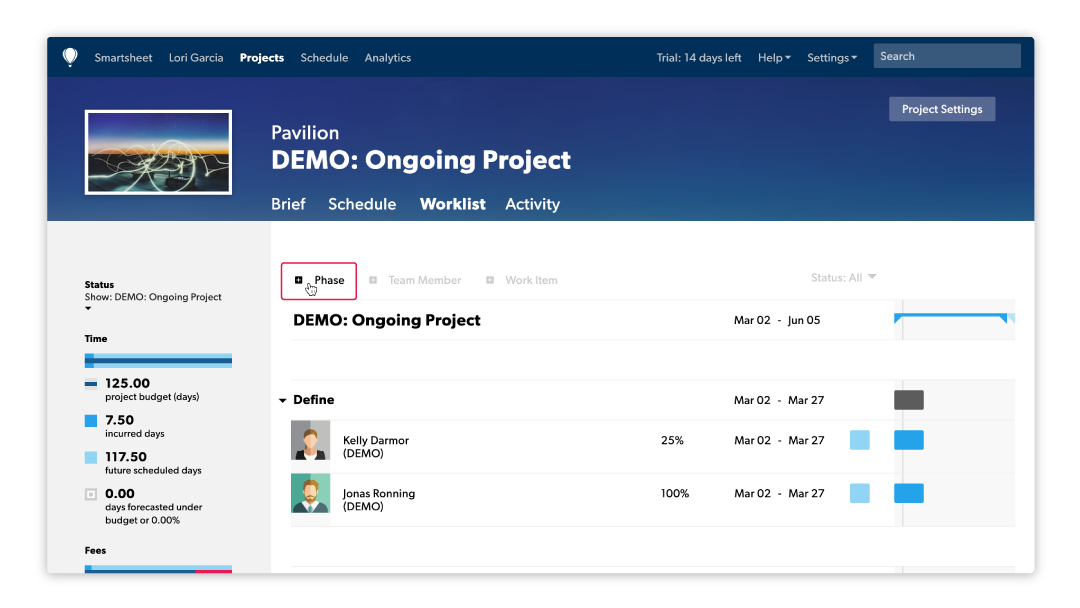
Once you add a project and set your basic project settings, navigate to the Worklist to quickly sketch out phases and assignments using only your keyboard. After you add all this high-level information, you can then go back and view the assignment details for each Work Item.
How to do it:
- Add all your key project information in Project Settings
- Navigate to the project Worklist
- Click + Phase to add a new phase at the bottom of the Worklist
- Type the phase name and press Enter on your keyboard to quickly add another phase. Repeat this process for all phases within the project
- Adjust the dates of each phase (this ensures the Work Items you add will default to the phase dates)
- Hover below a phase name and click + Work Item
- Type the Work Item name and press Enter on your keyboard to quickly add another Work Item. Repeat this process for all deliverables within each phase
- Adjust dates and details for each Work Item under each phase
4. Add descriptions and tasks to Work Items
Work Items are ideal for defining more detailed deliverables within project phases. But what happens when you need even more detailed information? That’s where tasks and notes come in.
Now, you can easily add more detailed information for each Work Item, including notes about the deliverable, hyperlinks to related documents or software tools, and a detailed list of tasks that need to be accomplished to deliver the work.
How to do it:
- Navigate to the Worklist within any project
- Click on the Work Item you want to edit to open a new panel on the right-hand side your screen
- Click on Add Description in the panel to add notes and details, including links to other project-related sites or documents
- Click on Add Tasklist in the panel to add a series of tasks associated with the Work Item. Press enter after typing in the name of each task to quickly create your tasklist
5. Add a Work Item without assigning a Person
Sometimes you don’t yet know who will be assigned to the work when you’re planning a new project. In these cases, you can add a new Work Item without assigning a specific person.
Note that without assigning a resource, you cannot allocate time to a Work Item. You can, however, add a Placeholder resource and allocate time for that Placeholder. This little trick will help you accurately forecast your projects, without having to assign people to the work right away.
How to do it:
- From the project Worklist, click on + Work Item, from either the top of the Worklist, or by hovering below a specific phase
- Click on the date range to change the dates for the Work Item
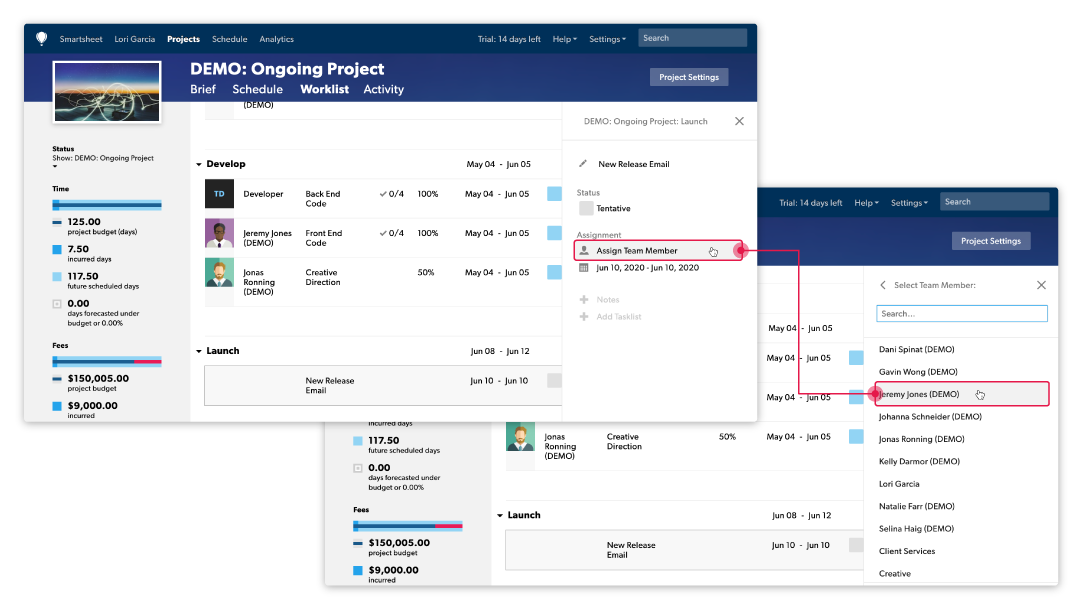
- To add a Placeholder resource, hover over the Work Item and click Assign. Choose the appropriate Placeholder from the list of people and resources
- After you assign a Placeholder, you can allocate time for the Work Item
6. Snap dates to today or phase start date when creating assignments
This one isn’t hidden, but it can be easily missed. When you’re setting a date range for a project or phase, a handy “Set to Today” shortcut appears under the calendar in the right-hand panel. For Work Items, a “Set to Phase Start/End” shortcut appears, too.
This makes it easy to quickly change dates for phases and deliverables, without paging through the calendar.
How to do it:
- Click on a date range for a project, phase, or Work Item
- When setting a start date, click “Set to Today” or “Set to Phase Start Date” below the calendar
- When setting an end date, click “Set to Today” or “Set to Phase End Date” below the calendar
7. Filter by status on the Worklist
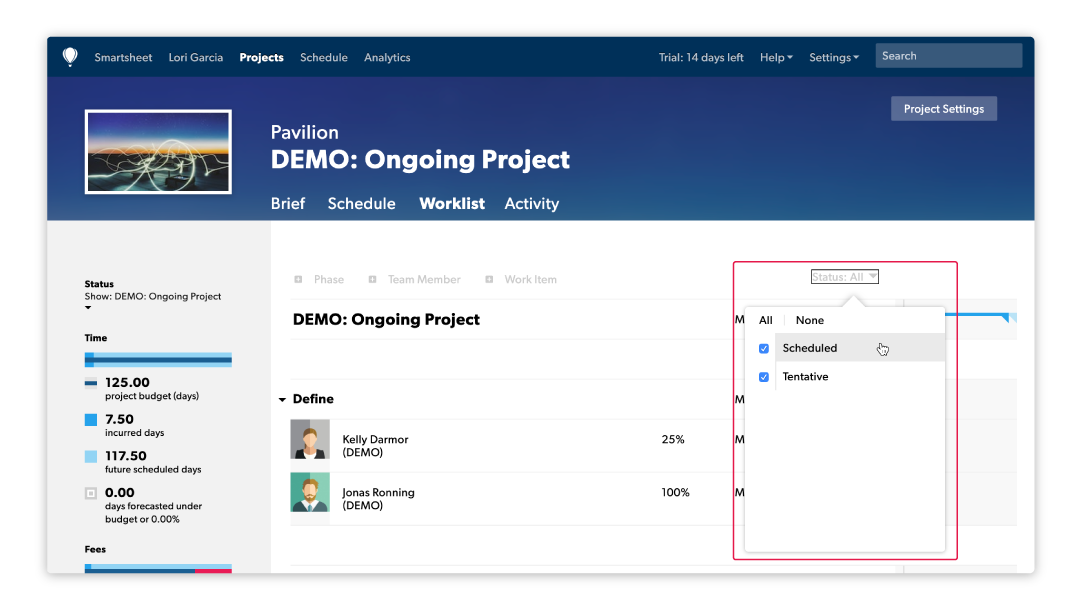
By default, the Worklist lists all Work Items under each phase of the project. This is great as an overview of all the work in progress, but what if you only want to see what’s already been completed, what’s running behind, or what’s currently blocked? Filtering by status solves this, so you can quickly find the information you need, and get back to the important stuff (like actually moving the project forward).
How to do it:
- On the top of the project Worklist, click Status: All
- Quickly clear or select all check boxes on this list by clicking None or All, or
- Select or deselect individual work statuses on this list to narrow in on the information you need
8. Jump to a project Worklist from the Resourcing Schedule
You can hover over any phase or assignment on the Schedule to see high-level details about the work. But even with this information, understanding every detail of the work might be difficult.
The good news? There’s an easy way to quickly jump directly to the Worklist for any project from the Schedule.
How to do it:
- Click on any project or phase on the Resourcing Schedule to open a menu of information to edit
- Click the pencil (the second icon on the list)
- From this new subpanel, click View Details to go directly to the project Worklist
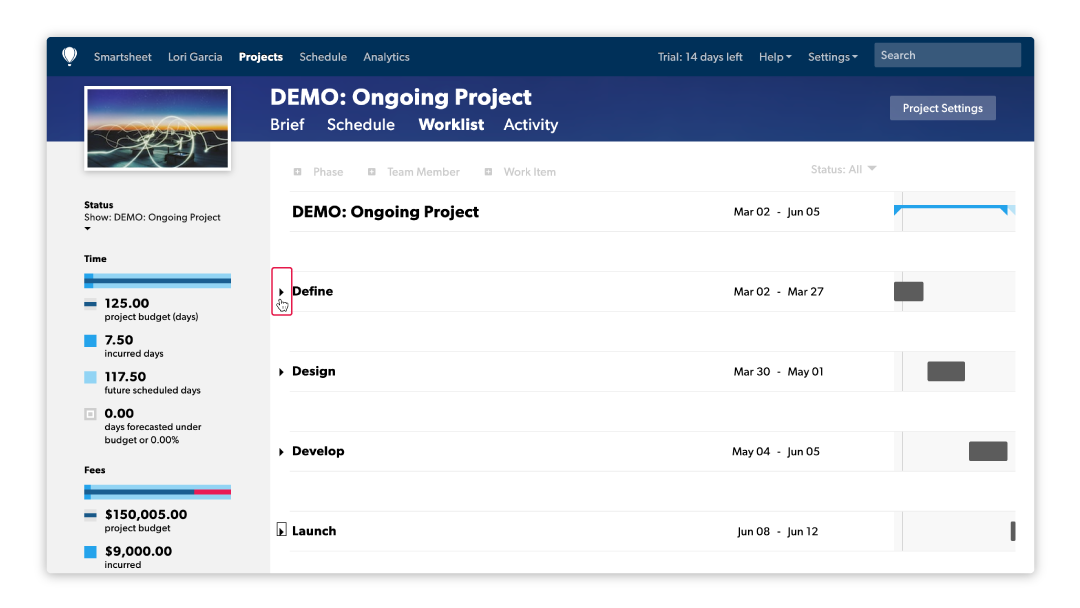
9. Collapse phases on the Worklist
When you have a long-lasting project with a lot of phases and deliverables, the Worklist can start to feel overcrowded. When you want to clear the clutter, there's an easy way to collapse phases on the Worklist, so you can focus on the areas of the project that matter most.
How to do it:
- On the project Worklist, click on the small arrow icon that's on the left-hand side of any project phase.
- The phase will collapse, hiding all of the Work Items that are attached to it.
10. Duplicate assignments on Schedule
Sometimes you need multiple people to work on the same deliverable. But manually creating multiple Work Items with the same information and assigning to different people takes a long time.
Using this simple workaround to duplicate assignments on the Schedule, you can quickly create multiple copies of the same assignment. These identical assignments can then be reassigned to other people.
How to do it:
- On the project Worklist, click on the small arrow icon that's on the left-hand side of any project phase.
- The phase will collapse, hiding all of the Work Items that are attached to it.
